
Discover how to create a logo in Photoshop with this step-by-step guide.
When you purchase through links on our site, we may earn an affiliate commission. Here’s how it works.
While vector-based software such as Illustrator is usually a designer's go-to when it comes to logo design, it is possible to design a logo in Photoshop. While the latter's pixel base is less suitable for designing logos than Illustrator, which lets you create something that can be scaled up and down without losing quality, Photoshop is certainly capable of creating something useable.
So, if you only have Photoshop as a single app or as part of Adobe's Photography Plan, no worries. You can make a logo in Photoshop, just be aware that you might have issues if you want to change its size. If you don't have either software, see our guides to how to download Photoshop and how to download Adobe Illustrator.
In the guide below, we’ll walk you through a basic option for how to make a logo in Photoshop using simple shape tools, gradients and text options. Of course, you'll want to make a logo in Photoshop that reflects your brand, not the specific example that we're going to create for purposes of demonstration, but you can use the same concepts and tools to create your own design. For some tips, see our feature on how to design a logo.
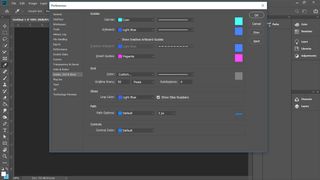
Open Photoshop and create a new document. I used a canvas size of 500px x 500px, but larger sizes would work just as well. You can change the canvas size at any point. Go to Edit > Preferences > Guides, grids to set a gridline every 50px. Then turn the grids on, in the canvas, by pressing cmd + ' (ctrl + ' in Windows) or View > Show > Grid in the Options bar. Make sure Snap to Grid is ticked on under View > Snap to.
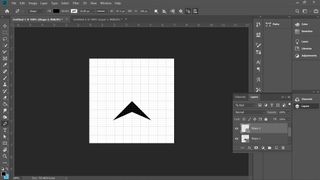
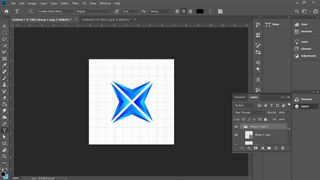
Select the Pen tool in the toolbar, or by pressing P, and make sure it’s set to Shape rather than Path in the box at the left of the Options bar. Use the pen to draw an arrowhead shape, starting at the centre-point of the canvas and using grid-line intersections for your other points (if you're not familiar with the pen tool, note that to draw a straight line, you simply click and release where you want the points to be – don't hold down an try to draw a line as if it were a brush).
Naming the layers isn't necessary for this project, but it can be very helpful in more complicated documents, where there are many layers.
Duplicate the layer, by pressing cmd + J (ctrl + J) and click on the new layer to select it. Use the Direct Selection tool, shortcut A, to click on the top-most point of the arrowhead, located at the centre of the canvas. Move this point down a few grid squares, holding the Shift key to keep it locked on the y-axis.
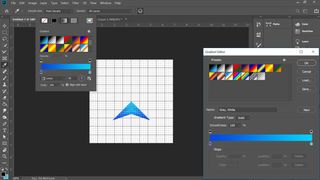
Create a new gradient in the Fill drop-down menu, to the left of the Options bar. In the gradient window, double click on the bottom sliders to bring up RGB options, where you can choose your colours; I went for a light and dark blue. Then apply this gradient to both objects, changing the gradient rotation so they oppose each other. If you can’t see the Fill options, it may be because you may have the Move tool selected, so switch to the Pen or Shape tool.
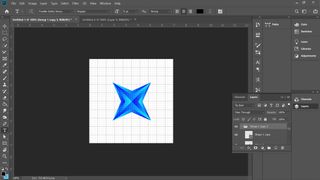
Group the two layers by selecting them and pressing the group button, which looks like a little folder, located at the bottom of the Layers tab. This prevents the Layers tab from becoming messy and makes it easier to handle the two layers together.
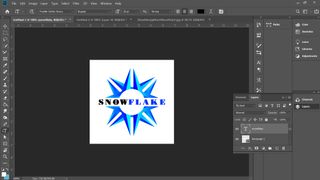
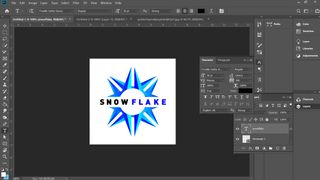
Duplicate this group (right click and select Duplicate Group), and then use the Free Transform function to rotate the new group ninety-degrees, holding down the Shift key to rotate in fifteen-degree increments. You can access Free Transform using cmd + T or under Edit > Free Transform. Now move the second group up, until it reflects the original shape, using the centre of the canvas as a line of symmetry. Repeat to create the shape shown above.
Nudge each shape up or down one grid square, away from the centre point, using Shift + cursor key.
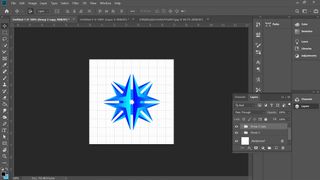
Using the same method from step #5 to group the layers together, duplicate the group and rotate by 45-degrees. The new shape should resemble a sort of crosshair shape.
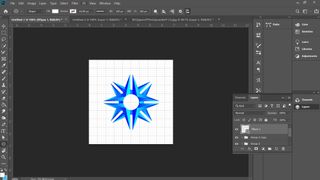
Cycle through Shape tools until you find a circle, either by clicking-and-holding on the icon in the toolbar or pressing Shift + U. Click on the centre point of the canvas, holding Alt to draw a circle radiating from the centre, and Shift to keep the width and height proportional. If you make a mistake, you can undo or re-edit your shape using Free Transform.
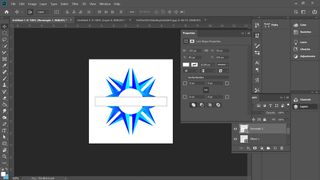
Cycle through the shape tools again, until you find the rectangle tool. Draw a white box across the graphic, above the other layers, making enough space for text. You can align this to the centre of the canvas by clicking on the rectangle layer and the bottom layer (which should be a white square, the same size as the canvas) and using align tools, either found under Layers > Align in the Menu Bar or the align buttons in the options bar.
More advanced users could use this rectangle to subtract from the shapes below, using Layer > Combine shapes, but for now we will just stick to using it as a white block.
Next up in our simple method of how to make a logo in Photoshop, we'll add some text. Draw a text box over the rectangle, by clicking on the T icon in the toolbar or pressing T, then dragging across the canvas. Type your text into the box and centre it, using the buttons in the Character tab. Use the align tool again to centre this to the canvas.
Choose a typeface that suits your brand. There are plenty of free fonts out there, but it is crucial to pick one that you have permission to use – see our pick of the best free fonts for some ideas. Since this logo may appear across many of your assets, you should make sure you don't use an illegally downloaded typeface – you may be surprised how quickly you might hear from the owner. Play around with size and colour until you like what you see.

Kern the text. This means adjusting the horizontal spacing between individual letters, maximising the word’s readability. You can do this under the Type tab, marked with V | A, or by clicking between the letters and pressing alt + left or alt + right. For more on kerning, see our post on how to kern type.

Finally to finish making your logo in Photoshop, make any final adjustments you need to give it that special something. For the main image at the top of this page, we've added two smaller bars above and below the text, coloured with the same gradient. We also added a background, shadow and reflection, using similar techniques to the other steps, as well as using layer masks to add fade.
When you're happy, save the image out in whatever format you require, for example RGB jpg for web format. It's a good idea to save it as a psd file so that you can return to it and make changes in the future.
Photoshop is a raster-based rather than vector-based design program, but it can vectorise images for export, which is ideal if you're going to want to resize them. That's probably the case if you make a logo in Photoshop. First you need to separate your logo from the background. To do that, make a selection and copy it to a new layer or remove the background.
Right click over the selection and select 'Make Work Path' then hit A to change to the direct selection tool. Right click again and select 'Create Vector Mask'. You can then save the file in Photoshop EPS format.
Daily design news, reviews, how-tos and more, as picked by the editors.
By submitting your information you agree to the Terms & Conditions and Privacy Policy and are aged 16 or over.
Thank you for reading 5 articles this month* Join now for unlimited access
Enjoy your first month for just £1 / $1 / €1
*Read 5 free articles per month without a subscription
Join now for unlimited access
Try first month for just £1 / $1 / €1
Designer and Video ProducerMatt has worked for various publishing houses and design agencies, covering studio photography, video production, editorial design, branding, illustration and motion graphics. He currently works for Future PLC with brands such as T3, Woman&Home, Marie Claire, Music Week, TechRadar, Golden Joysticks, Cycling Weekly, Brand Impact Awards, Horse&Hound and Tech&Learning. In the past he has designed titles including Mac|Life, IQ, Bow International, Drummer, iDrum, Acoustic, Clay Shooting, Sea Fishing and GunTradeNews. He has experience across the full Adobe Suite and is currently spending a lot of time creating projects in Blender and After Effects.